Documentation
Complete guide to Loxone AI — control your smart home via Claude and other AI assistants using the MCP protocol.
Quick Start
Get started with Loxone AI in 3 steps:
1 Create an account
Register at loxoneai.com via email, Google, or Apple.
2 Add your Loxone connection
In the Dashboard, click "Add connection" and enter:
- Serial number: your Miniserver serial number (e.g.
504F94XXXXXX) — how to find it - Username: your Loxone account username
- Password: your Loxone account password
Click "Verify" to test the connection.
Note: if you have just created a new Loxone user, verify the password by signing in with the Loxone app first. After a few failed attempts the Miniserver temporarily blocks that user and you have to wait a few minutes.
3 Connect your AI assistant
In the Dashboard, copy the MCP configuration for your application:
- Claude Desktop / Cursor / Windsurf: copy the config snippet and paste it into your app's MCP settings
- Claude.ai (web): use the OAuth flow — click "Connect" in the Dashboard and authorize in your browser
Requirements
- Loxone Miniserver (Gen 1 or Gen 2) accessible over the network
- Claude Desktop, Claude.ai, Cursor, Windsurf, or any MCP-compatible client
- Network access between the Loxone Miniserver and the internet, so the cloud server can reach it
Cloud MCP
The Cloud MCP server runs on our infrastructure at https://cloud.loxoneai.com/cloud/mcp. Your Loxone credentials are stored encrypted in our database — no software installation needed on your machine.
- Works from anywhere — no local network required
- Available for all registered users
- Supports Claude.ai (web), Claude Desktop, Cursor, Windsurf, and more
- All traffic encrypted via HTTPS / OAuth 2.0
Authentication
The Cloud MCP server uses OAuth 2.0. The authorization server is https://loxoneai.com.
- Authorization Code + PKCE — for Claude.ai web and apps that open a browser window
- Client Credentials — for headless clients (Claude Desktop, Cursor, Windsurf) using a Bearer token
Get your access token or OAuth credentials from the Dashboard → API Keys tab.
App Configuration
Configurations for supported applications:
Claude.ai (web)
Uses the OAuth Authorization Code flow — no manual config needed. In the Dashboard, click Connect to Claude.ai and authorize in your browser.
Claude Desktop
Or configure manually — for other clients (Cursor, VS Code, Claude Code), this is the way to go:
Config file: ~/Library/Application Support/Claude/claude_desktop_config.json (macOS) or %APPDATA%\Claude\claude_desktop_config.json (Windows)
{
  "mcpServers": {
    "loxone-cloud": {
      "command": "npx",
      "args": ["-y", "mcp-remote",
        "https://cloud.loxoneai.com/cloud/mcp",
        "--header", "Authorization: Bearer YOUR_ACCESS_TOKEN"]
    }
  }
}mcp-remote to connect to remote MCP servers.Cursor
Config file: ~/.cursor/mcp.json
{
  "mcpServers": {
    "loxone-cloud": {
      "url": "https://cloud.loxoneai.com/cloud/mcp",
      "headers": {
        "Authorization": "Bearer YOUR_ACCESS_TOKEN"
      }
    }
  }
}
Windsurf
Config file: ~/.codeium/windsurf/mcp_config.json
{
  "mcpServers": {
    "loxone-cloud": {
      "serverUrl": "https://cloud.loxoneai.com/cloud/mcp",
      "headers": {
        "Authorization": "Bearer YOUR_ACCESS_TOKEN"
      }
    }
  }
}
Continue
Config file: ~/.continue/config.yaml
mcpServers:
  - name: loxone-cloud
    url: https://cloud.loxoneai.com/cloud/mcp
    requestOptions:
      headers:
        Authorization: "Bearer YOUR_ACCESS_TOKEN"
Cline
{
  "mcpServers": {
    "loxone-cloud": {
      "url": "https://cloud.loxoneai.com/cloud/mcp",
      "headers": {
        "Authorization": "Bearer YOUR_ACCESS_TOKEN"
      }
    }
  }
}
Custom app / API
Get an access token via OAuth 2.0 Client Credentials:
curl -X POST https://loxoneai.com/oauth/token \
  -d "grant_type=client_credentials&client_id=YOUR_CLIENT_ID&client_secret=YOUR_SECRET"
Then pass the token as Authorization: Bearer ACCESS_TOKEN to the MCP endpoint.
Loxone Cloud
You only enter the serial number — the Loxone Cloud connection is created automatically:
dns.loxonecloud.com/YOUR_SERIAL_NUMBERRemote Connect (Loxone Cloud) must be enabled on the Miniserver. Find the serial number in the Loxone App: menu → ⓘ info.
How to find your serial number
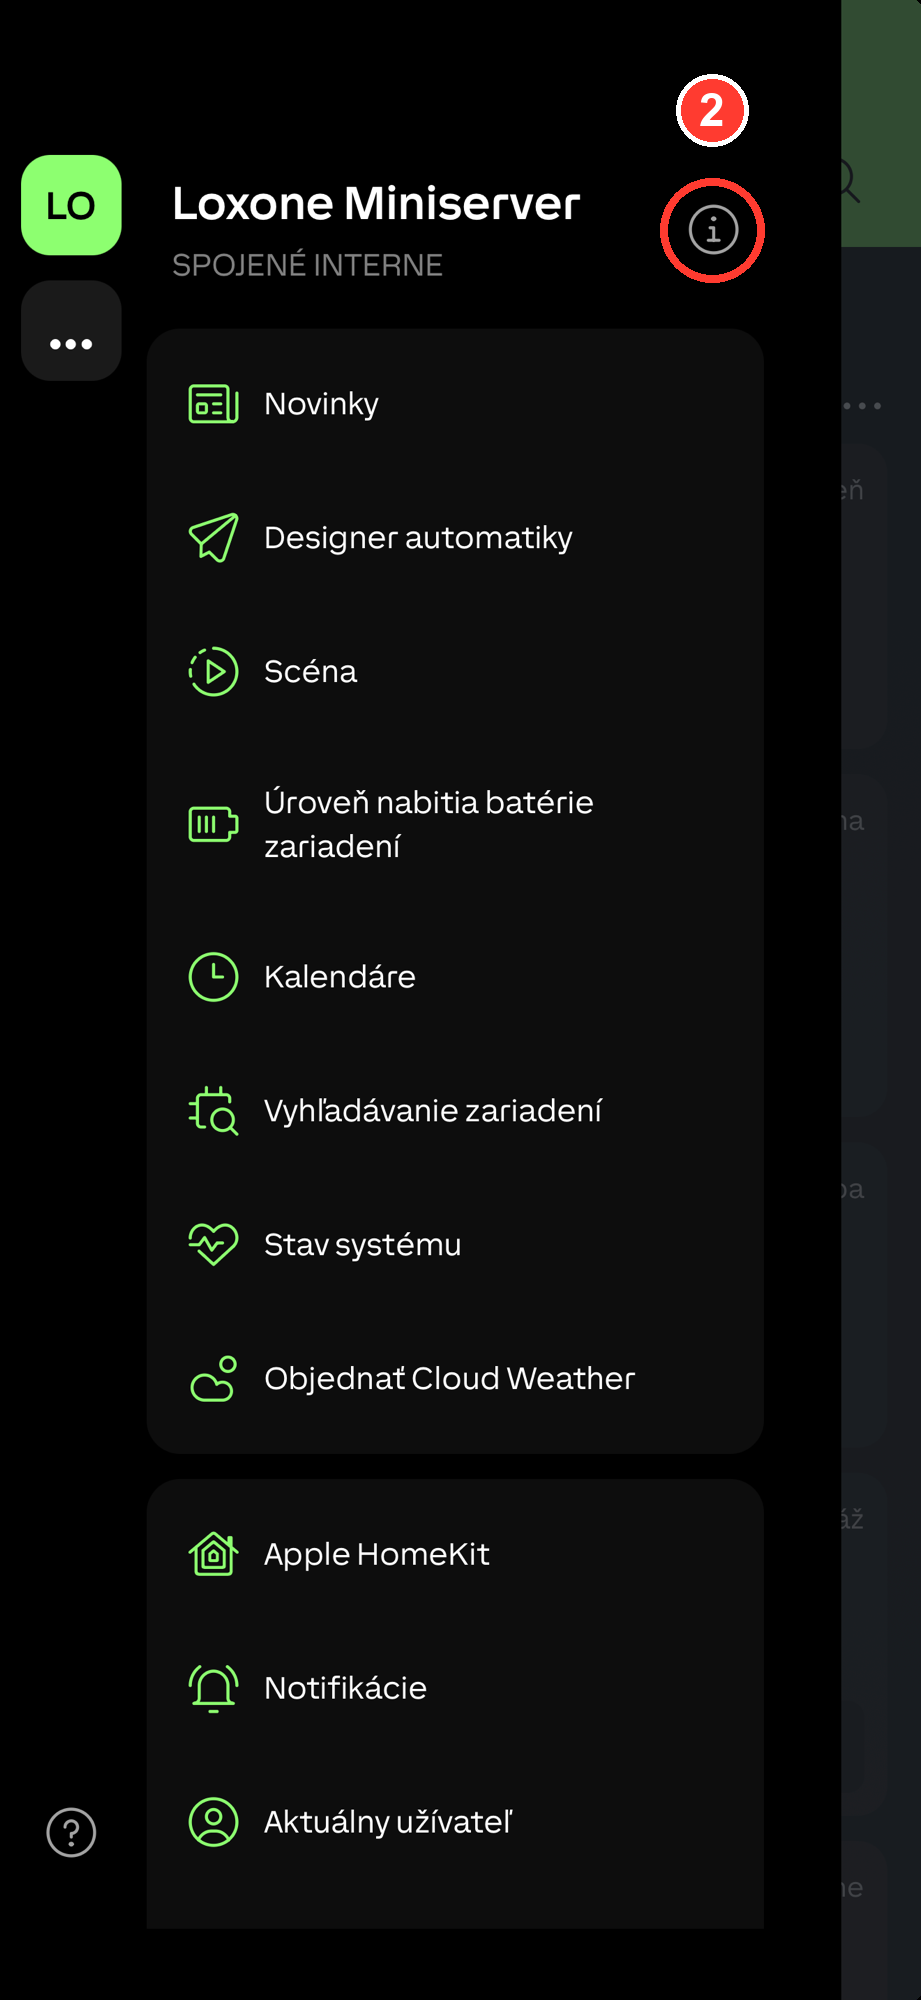
Your serial number is the Miniserver's MAC address — it goes into the Cloud URL dns.loxonecloud.com/<serial>. The easiest place to find it is the Loxone app:
- Open the Loxone app and tap the menu (☰) in the top-left.
- Tap the info icon (ⓘ) next to your Miniserver's name.
- Read the Serial number row — that is your MAC (12 characters, e.g.
504F94XXXXXX).


Working Examples
These examples demonstrate core functionality of the Loxone AI MCP server. Each shows the natural language prompt sent to the AI, the MCP tool call made, and the expected response.
"Turn on the lights in the living room"{
"tool": "loxone_light_on",
"arguments": {
"control": "Living Room"
}
}{
"success": true,
"message": "Light turned on: Living Room",
"device": "Living Room",
"action": "on"
}"What is the temperature in the bedroom?"{
"tool": "loxone_get_temperature",
"arguments": {
"room": "Bedroom"
}
}{
"room": "Bedroom",
"temperature_c": 21.4,
"unit": "°C",
"sensor": "Temperature Bedroom"
}"Close the blinds in the living room"{
"tool": "loxone_blind_down",
"arguments": {
"control": "Living Room"
}
}{
"success": true,
"message": "Blind moved down: Living Room",
"device": "Living Room",
"action": "down"
}"Show me all devices in my home"{
"tool": "loxone_list_devices",
"arguments": {}
}{
"lights": [
{ "name": "Living Room", "room": "Living Room", "type": "LightControllerV2" },
{ "name": "Kitchen", "room": "Kitchen", "type": "Dimmer" }
],
"blinds": [
{ "name": "Blind Living Room", "room": "Living Room", "type": "Jalousie" }
],
"gates": [
{ "name": "Garage Door", "room": "Garage", "type": "Gate" }
],
"thermostats": [
{ "name": "Temperature Bedroom", "room": "Bedroom", "type": "InfoOnlyAnalog" }
]
}"Dim the bedroom lights to 30%"{
"tool": "loxone_dimmer",
"arguments": {
"control": "Bedroom",
"value": 30
}
}{
"success": true,
"message": "Dimmer set to 30%: Bedroom",
"device": "Bedroom",
"value": 30
}Natural Language Commands
Loxone AI understands natural language. Here are example prompts you can use:
Lights
"Turn on the living room lights"
"Turn off all lights"
"Dim the bedroom lights to 30%"
"Set the kitchen light to 80%"
"What lights are currently on?"
Blinds & shutters
"Close the blinds in the living room"
"Open all blinds"
"Set blinds to 50%"
"Close the shutters in the bedroom"
Temperature
"What is the temperature in the living room?"
"Show temperatures in all rooms"
"Which room is the warmest?"
Gates & garage
"Open the garage door"
"Close the entrance gate"
Devices
"Show all devices"
"What devices are in the kitchen?"
"List all lights"
Supported Devices
| Type | Loxone types | Actions |
|---|---|---|
| 💡 Lights | LightController, LightControllerV2, Dimmer, Switch |
On, off, dimming (0–100%) |
| 🪧 Blinds | Jalousie, Blind |
Up, down, position (0–100%) |
| 🚗 Gates | Gate |
Open, close |
| 🌡️ Temperature | InfoOnlyAnalog (name contains "temperature") |
Read current value |
| 🏠 Room summary | All types | Lights, blinds, temperature, presence |
| 📊 Presence | PresenceDetector, Motion |
Read occupancy state |
MCP Tools Reference
The Loxone AI MCP server exposes 32 tools. Key tools:
loxone_list_devices
Returns all devices grouped by category (lights, blinds, gates, thermostats, presence, sensors).
loxone_light_on / loxone_light_off
Turn a light or room on/off. Parameter: control — device or room name.
loxone_dimmer
Set light brightness. Parameters: control (device/room), value (0–100).
loxone_blind_up / loxone_blind_down
Fully open or close a blind. Parameter: control — device or room name.
loxone_blind_position
Set blind to a specific position. Parameters: control, position (0=open, 100=closed).
loxone_get_temperature
Read current temperature from a room sensor. Parameter: room.
loxone_get_room_climate
Get full climate overview for a room: temperature, humidity, target temperature, thermostat mode.
loxone_get_room_summary
Complete room overview: all lights, blinds, temperature, humidity, presence.
loxone_get_all_lights_status
On/off/dimmer status of all lights in the entire home, grouped by room.
loxone_gate_open / loxone_gate_close
Open or close a gate or garage door. Parameter: control.
loxone_get_weather
Outdoor weather: temperature, wind speed, rain, brightness, storm warnings.
loxone_get_energy
Energy consumption and production data (grid, solar PV, battery).
readOnlyHint / destructiveHint) and human-readable titles for correct LLM behavior.Troubleshooting
Claude doesn't see Loxone tools
- Fully restart Claude Desktop (quit and reopen — not just close the window)
- Verify the MCP server is running
- Check the configuration file at
~/Library/Application Support/Claude/claude_desktop_config.json(macOS) or%APPDATA%\Claude\claude_desktop_config.json(Windows)
Cannot connect to Loxone
- Verify Remote Connect (Loxone Cloud) is enabled on the Miniserver — the cloud server connects through Loxone Cloud
- Double-check the serial number in the Loxone App (menu → ⓘ info)
- Verify credentials by logging into the Miniserver's web interface directly
- If using Loxone Cloud, double-check the MAC address
Devices not found
- The MCP server caches the device list — restart the server after adding new devices in Loxone Config
- Devices must be active in Loxone Config
- Temperature sensors must include "temperature" or "teplota" in their name
Cloud access not working
- Check your access token is valid — copy a fresh one from the Dashboard
- Verify your internet connection
- Check the server status at
https://cloud.loxoneai.com/health